
How to make your own magnetic poetry

Meg Pickard made some lovely fridge magnets using her Moo mini cards and some self-adhesive magnetic tape. That magnetic tape is a lovely thing indeed. Meg's mind wanders (emphasis mine):
I'm thinking about experimenting some more - perhaps with just food-related designs, or (even better!) individual words, so that I could use it like a giant set of magnetic fridge poetry.
I love that idea, and I've been thinking about that myself, but I haven't gotten around to actually doing it yet.
What I have done, though, is non-gigantic magnetic poetry using narrower magnetic tape. Here's how:
The tools
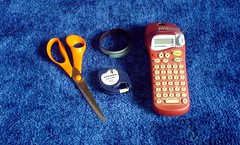
These are the tools you'll need.
- 12.5 mm self-adhesive magnetic tape
- Scissors
- Labelmaker (mine is a Dymo LetraTAG XM) with white 12 mm tape
The magnetic tape might be hard to find, but look in craft shops or similar. In Sweden, Clas Ohlson is a safe bet; that's where I got mine.
Attentive readers may have noticed that the magnetic tape is actually half a millimeter wider than the label tape. That might seem like a slight nuisance, but you can actually use it to your advantage (and it's a lot better than if it were the other way around).
Words-on-a-strip
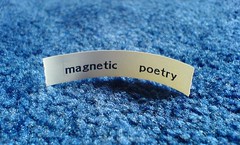 Now it's time to go nuts with the labelmaker. Print a bunch of them at
a time, putting a few spaces between words. I used five spaces here,
which may have been a bit much.
Now it's time to go nuts with the labelmaker. Print a bunch of them at
a time, putting a few spaces between words. I used five spaces here,
which may have been a bit much.
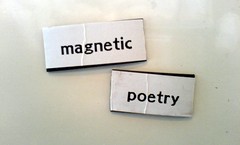
I recommend that you cut the labels into individual words before you continue, especially if you're using paper labels. Otherwise, the scissors may wrinkle the edges when you cut them up. Also, this is a good time to trim any excess whitespace, without wasting precious magnetic tape.
Stick it on


Peel off the protective strip from the magnetic tape, just enough to give room for a few words. Then pick up a word label and do the same. Or even better, apply a couple of words while you're at it.
 Then carefully stick the two together, making sure it's as straight as
possible. This is where the 0.5 mm difference in width gives you a
little leeway.
Then carefully stick the two together, making sure it's as straight as
possible. This is where the 0.5 mm difference in width gives you a
little leeway.
You may want to uncurl the magnetic strip a bit first, to avoid wrinkles later (again, especially with paper labels). Just bend it in the opposite direction for a few seconds, and you'll probably be fine.
Remember, you're sticking two adhesive surfaces together, which basically means you'll have to get it right the first time.
(As you can see from this picture, I didn't follow my own advice on cutting the label first. Shame on me.)
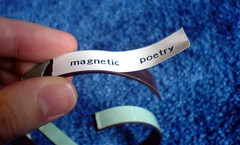
Cut them up
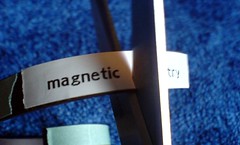 Now you can cut the magnetic tape. If you did follow my advice, you
can either cut the magnetic tape after applying each label, or you can
stick on a few, end to end, and then cut between them. I recommend the
latter.
Now you can cut the magnetic tape. If you did follow my advice, you
can either cut the magnetic tape after applying each label, or you can
stick on a few, end to end, and then cut between them. I recommend the
latter.
That's it!
 Guess what? You're done. I had to work the ends a bit, though, because the
scissors mangled them slightly.
Guess what? You're done. I had to work the ends a bit, though, because the
scissors mangled them slightly.
You can see the wrinkles on these babies, too. I'm using paper labels here, and I didn't do the uncurl thing, which led to these wrinkles when I straightened the finished pieces. Plastic labels are thicker and may be more forgiving, but you should still keep that in mind.
Lather, rinse, repeat.
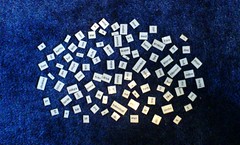 Two words may be fun, but you may also want to make a whole set. This
is part of a Swedish hundred-or-so-word set I made a while ago.
Two words may be fun, but you may also want to make a whole set. This
is part of a Swedish hundred-or-so-word set I made a while ago.
If you make a set, here are a few things you may want to consider:
- Make more than one of articles and pronouns, like "the", "a", "you", etc.
- Make some suffixes, like "s" for plurals, "ly" for adverbs, etc. Watch the whitespace on the left end of these.
- You'll be fine without periods or commas, but question marks and exclamation marks can add some expressiveness to your poetry.
- Maybe some prefixes, too? "un", "de", etc.
Also, think themes! I made a 99-word "sky-diving poetry" for my sister when she had just gotten her sky diving certificate, with words like "geronimo", "faceplant", "plane" and "bounce". Endless fun!
Appendix A: Packaging
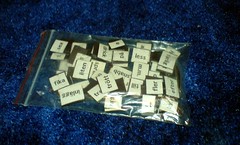 For extra credit, add some packaging. Ziplock bags are great. For a
lot of things. Including this.
For extra credit, add some packaging. Ziplock bags are great. For a
lot of things. Including this.
For my sister's sky-dyving poetry, I cut off a metal spatula and stuck all the words on it. That made an excellent scratch board for poetry on the move, too!
Good luck!